I Built a Lemlist Clone App That Personalizes My Email List at Scale
Generic emails are a one way ticket to the spam folder. But let’s face it, personalizing hundreds, or even thousands, of emails manually is tough work.
As a developer, I love solving problems like this. Instead of relying on pre-built tools like Lemlist, I will build my own Lemlist clone; a fully customizable app that automates outreach while crafting personalized emails. And better yet, I will show you how I did it, step-by-step.
This guide is perfect for fellow developers with a knack for coding. If you're up for the challenge, dive right in, though fair warning, it might get a little technical along the way. And for the seasoned pros out there, the full source code is ready and waiting for you to build your Lemlist clone app!
In this tutorial, we’ll cover:
- A quick video demo
- App Features
- Prerequisites
- Creating the app (with guided code snippets)
- Using OpenAI for personalized email generation (including code walkthroughs)
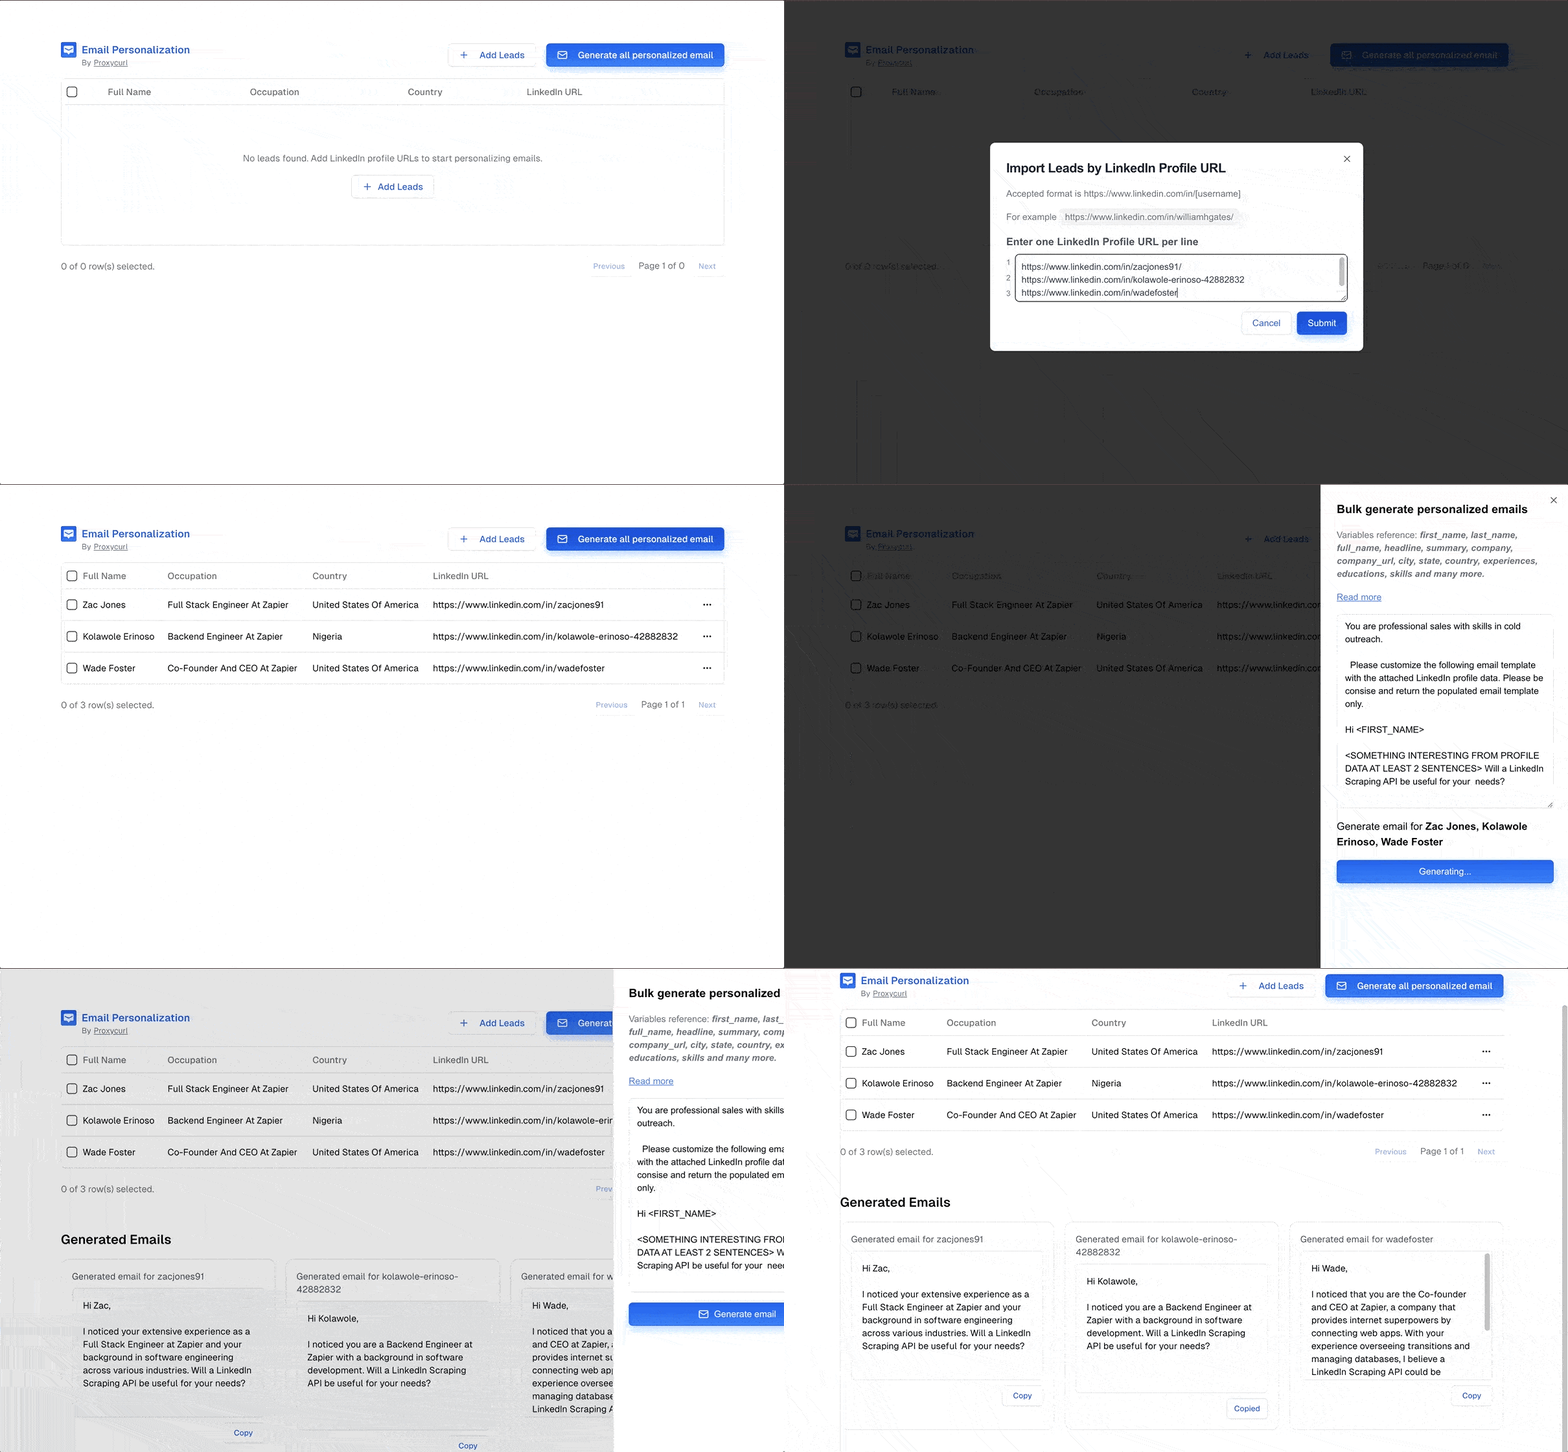
The final result result looks something like this:
Application Features
Application Features
The app has more functionality than what meets the eye. With this Lemlist Clone app, you can:
- Identify and Track Leads: Manage and track multiple Professional Social Network profiles for targeted lead generation.
- Enrich Lead Data: Enhance lead profiles using Proxycurl’s API for deeper insights.
- Generate Personalized Emails: Create unique, personalized emails for multiple leads with one click.
- Review and Copy Easily: Quickly view and copy generated emails in a gallery layout.
- Save Leads in Local Storage: Preserve leads in local storage to avoid data loss on refresh.
- Potential for Direct Integration with Email Platforms: While this isn’t fully implemented, the app could be extended to integrate with the Gmail API or another email provider, allowing users to directly create drafts without needing to copy-paste.
Prerequisites
To get started, make sure you have:
- Node v18+
- A Proxycurl API key
- An OpenAI API key for generating email content that’s unique and engaging.
- Familiarity with React.js & Next.js.
- Familiarity with Tailwind CSS.
Now that we've discussed the basics, let's get straight to it.
How to Build a Lemlist Clone App
Step 1: Register for a Proxycurl account
Proxycurl is a data enrichment company offering APIs that pull various data such as person data, company data, contact info, and more. You will need a Proxycurl account to get your hands on a unique API key. Its role here is to pull data from Professional Social Network profiles to inform your personalized emails. Simply sign up and access your Dashboard to get the bearer token.
What’s more, you get free credits upon signing up.
- 100 free credits if you sign up with a work email
- 10 credits for personal email
Step 2: Create a New Next.js Project
Start by setting up a new project in Next.js.
npx create-next-app@latest personalize-email
cd personalize-email && npm run dev
Then, add the following packages:
npx shadcn@latest add table input button checkbox sheet textarea dropdown-menu dialog card
npm install @tanstack/react-table openai
If you encounter an error, try using these specific versions:
    "next": "14.2.13",
    "react": "^18",
    "react-dom": "^18",
Step 3: Build a Lead Management Table
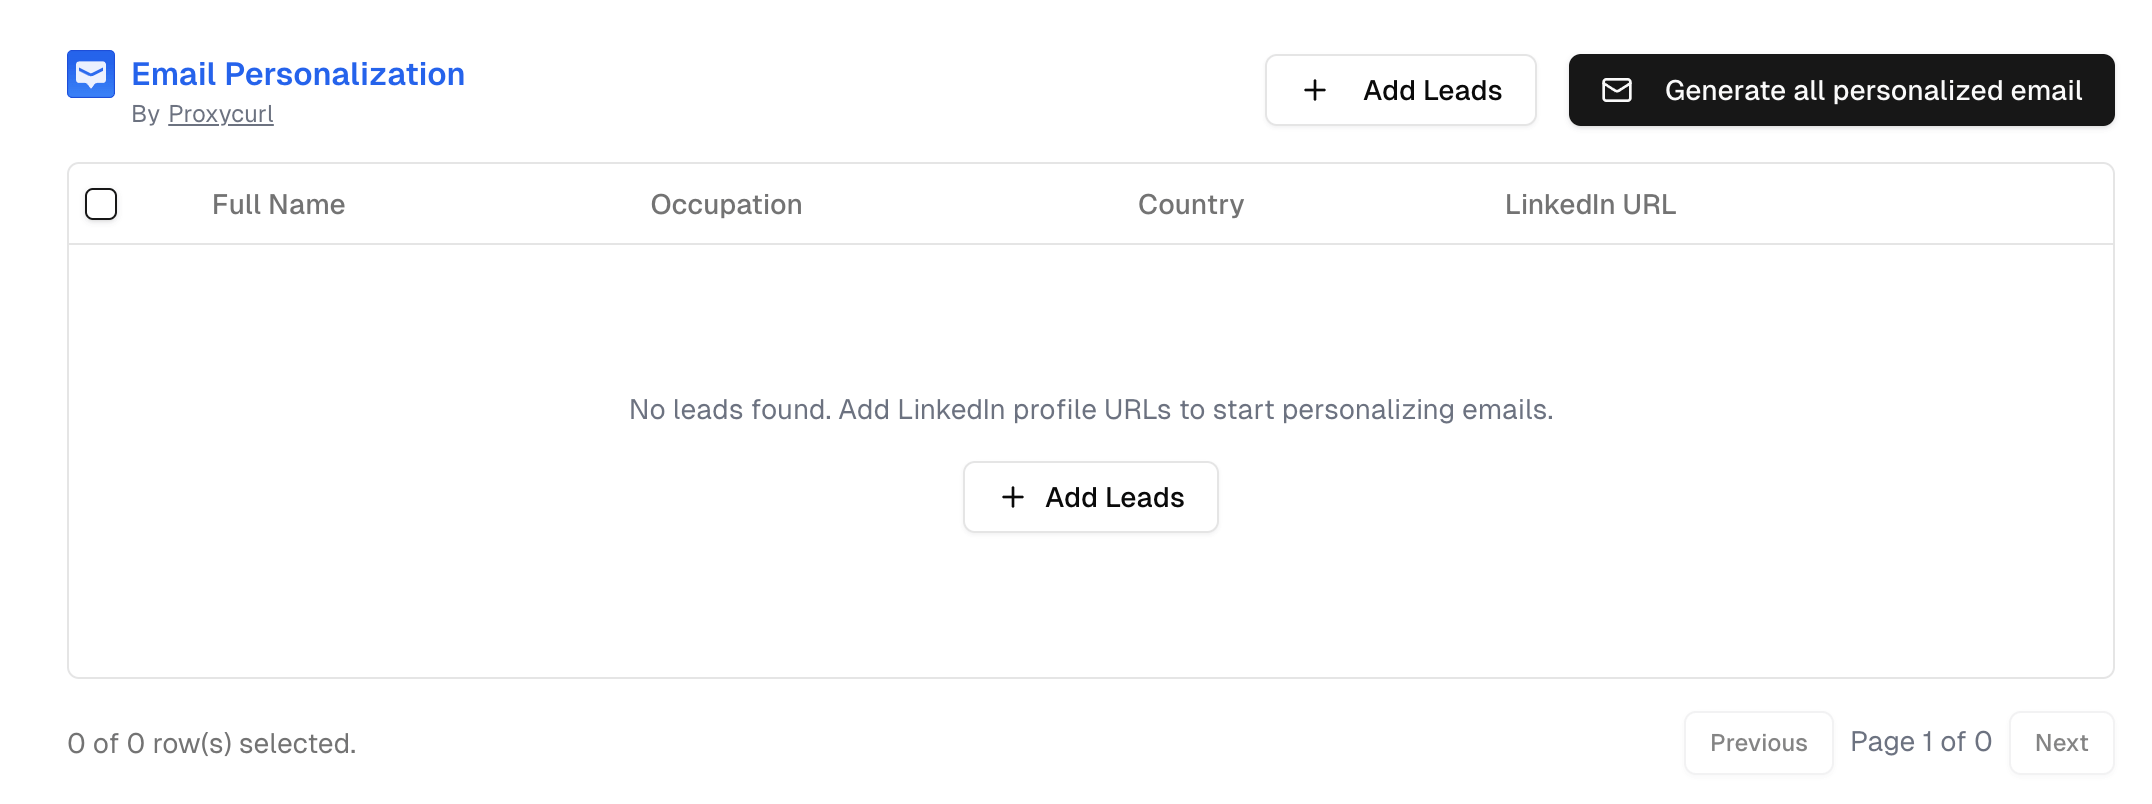
To make things efficient, we’ll use the Data Table from shadcn to create a structured view for displaying leads. The table will be configured to show each lead’s full name, occupation, country, and Professional Social Network profile URL.
export const columns = [
  {
    id: "select",
    header: ({ table }) => (
      <Checkbox
        checked={
          table.getIsAllPageRowsSelected() ||
          (table.getIsSomePageRowsSelected() && "indeterminate")
        }
        onCheckedChange={(value) => table.toggleAllPageRowsSelected(!!value)}
        aria-label="Select all"
      />
    ),
    cell: ({ row }) => (
      <Checkbox
        checked={row.getIsSelected()}
        onCheckedChange={(value) => row.toggleSelected(!!value)}
        aria-label="Select row"
      />
    ),
    enableSorting: false,
    enableHiding: false,
  },
  {
    accessorKey: "full_name",
    header: "Full Name",
    cell: ({ row }) => (
      <div className="capitalize">{row.getValue("full_name")}</div>
    ),
  },
  {
    accessorKey: "occupation",
    header: "Occupation",
    cell: ({ row }) => (
      <div className="capitalize">{row.getValue("occupation")}</div>
    ),
  },
  {
    accessorKey: "country_full_name",
    header: "Country",
    cell: ({ row }) => (
      <div className="capitalize">{row.getValue("country_full_name")}</div>
    ),
  },
  {
    accessorKey: "public_identifier",
    header: "Professional Social Network URL",
    cell: ({ row }) => (
      <div>{`https://www.professionalsocialnetwork.com/in/${row.getValue(
        "public_identifier",
      )}`}</div>
    ),
  },
  {
    id: "actions",
    enableHiding: false,
    cell: ({ row, table }) => {
      return (
        <DropdownMenu>
          <DropdownMenuTrigger asChild>
            <Button variant="ghost" className="p-0 w-8 h-8">
              <span className="sr-only">Open menu</span>
              <MoreHorizontal className="w-4 h-4" />
            </Button>
          </DropdownMenuTrigger>
          <DropdownMenuContent align="end">
            <DropdownMenuLabel>Actions</DropdownMenuLabel>
            <DropdownMenuItem></DropdownMenuItem>
            <DropdownMenuSeparator />
          </DropdownMenuContent>
        </DropdownMenu>
      );
    },
  },
];
Then create app/components/Leads.jsx and import the column there. We will also hold the state of the app in this component.
"use client";

import Image from "next/image";
import React, { useState, useEffect } from "react";
import {
  flexRender,
  getCoreRowModel,
  getFilteredRowModel,
  getPaginationRowModel,
  getSortedRowModel,
  useReactTable,
} from "@tanstack/react-table";
import {  Mail, Plus, } from "lucide-react";
import { Button } from "@/components/ui/button";
import { columns } from './columns';


function Leads() {
  const [data, setData] = useState([]);
  const [sorting, setSorting] = useState([]);
  const [columnFilters, setColumnFilters] = useState([]);
  const [columnVisibility, setColumnVisibility] = useState({});
  const [rowSelection, setRowSelection] = useState({});

  const table = useReactTable({
    data,
    columns,
    onSortingChange: setSorting,
    onColumnFiltersChange: setColumnFilters,
    getCoreRowModel: getCoreRowModel(),
    getPaginationRowModel: getPaginationRowModel(),
    getSortedRowModel: getSortedRowModel(),
    getFilteredRowModel: getFilteredRowModel(),
    onColumnVisibilityChange: setColumnVisibility,
    onRowSelectionChange: setRowSelection,
    state: {
      sorting,
      columnFilters,
      columnVisibility,
      rowSelection,
    },
  });

  return (
    <div className="w-full max-w-5xl">
      <div className="flex flex-col justify-between items-start py-4 space-y-4 pt-md-8 sm:flex-row sm:items-center sm:space-y-0">
        <div className="flex gap-2 items-start">
          <div className="flex items-center">
            <Image
              src="/email-logo-dummy.svg"
              alt="Email logo"
              width={24}
              height={24}
              className="text-blue-600"
            />
          </div>
          <div className="flex flex-col items-start">
            <span className="font-semibold text-blue-600">
              Email Personalization
            </span>
            <span className="text-xs text-gray-500">
              By
              <a
                href="https://nubela.co/proxycurl"
                target="_blank"
                rel="noopener noreferrer"
                className="underline ms-1"
              >
                Proxycurl
              </a>
            </span>
          </div>
        </div>
        <div className="flex flex-col gap-2 w-full sm:flex-row sm:gap-4 sm:w-auto">
          <Button variant="outline" className="w-full sm:w-auto">
            <Plus className="mr-2 w-4 h-4" /> Add Leads
          </Button>
          <Button className="w-full sm:w-auto">
            <Mail className="mr-2 w-4 h-4" /> Generate all personalized email
          </Button>
        </div>
      </div>
      <div className="rounded-md border">
        <div className="overflow-x-auto">
          <Table className="w-full whitespace-nowrap">
            <TableHeader>
              {table.getHeaderGroups().map((headerGroup) => (
                <TableRow key={headerGroup.id}>
                  {headerGroup.headers.map((header) => {
                    return (
                      <TableHead key={header.id} className="px-2">
                        {header.isPlaceholder
                          ? null
                          : flexRender(
                              header.column.columnDef.header,
                              header.getContext(),
                            )}
                      </TableHead>
                    );
                  })}
                </TableRow>
              ))}
            </TableHeader>
            <TableBody>
              {table.getRowModel().rows?.length ? (
                table.getRowModel().rows.map((row) => (
                  <TableRow
                    key={row.id}
                    data-state={row.getIsSelected() && "selected"}
                  >
                    {row.getVisibleCells().map((cell) => (
                      <TableCell key={cell.id} className="px-2">
                        {flexRender(
                          cell.column.columnDef.cell,
                          cell.getContext(),
                        )}
                      </TableCell>
                    ))}
                  </TableRow>
                ))
              ) : (
                <TableRow>
                  <TableCell
                    colSpan={columns.length}
                    className="h-24 text-center"
                  >
                    <div className="flex flex-col justify-center items-center py-16 h-full">
                      <p className="text-gray-500">
                        No leads found. Add Professional Social Network profile URLs to start
                        personalizing emails.
                      </p>

                      <Button variant="outline" className="mt-4">
                        <Plus className="w-4 h-4" /> Add Leads
                      </Button>
                    </div>
                  </TableCell>
                </TableRow>
              )}
            </TableBody>
          </Table>
        </div>
      </div>
      <div className="flex justify-end items-center py-4 space-x-2">
        <div className="flex-1 text-sm text-muted-foreground">
          {table.getFilteredSelectedRowModel().rows.length} of{" "}
          {table.getFilteredRowModel().rows.length} row(s) selected.
        </div>
        <div className="space-x-2">
          <Button
            variant="outline"
            size="sm"
            onClick={() => table.previousPage()}
            disabled={!table.getCanPreviousPage()}
          >
            Previous
          </Button>
          <span className="text-sm text-gray-500">
            Page {table.getState().pagination.pageIndex + 1} of{" "}
            {table.getPageCount()}
          </span>
          <Button
            variant="outline"
            size="sm"
            onClick={() => table.nextPage()}
            disabled={!table.getCanNextPage()}
          >
            Next
          </Button>
        </div>
      </div>
    </div>
  );
}

export default Leads;
The result should look something like this:
Step 4: Adding and Enriching Leads
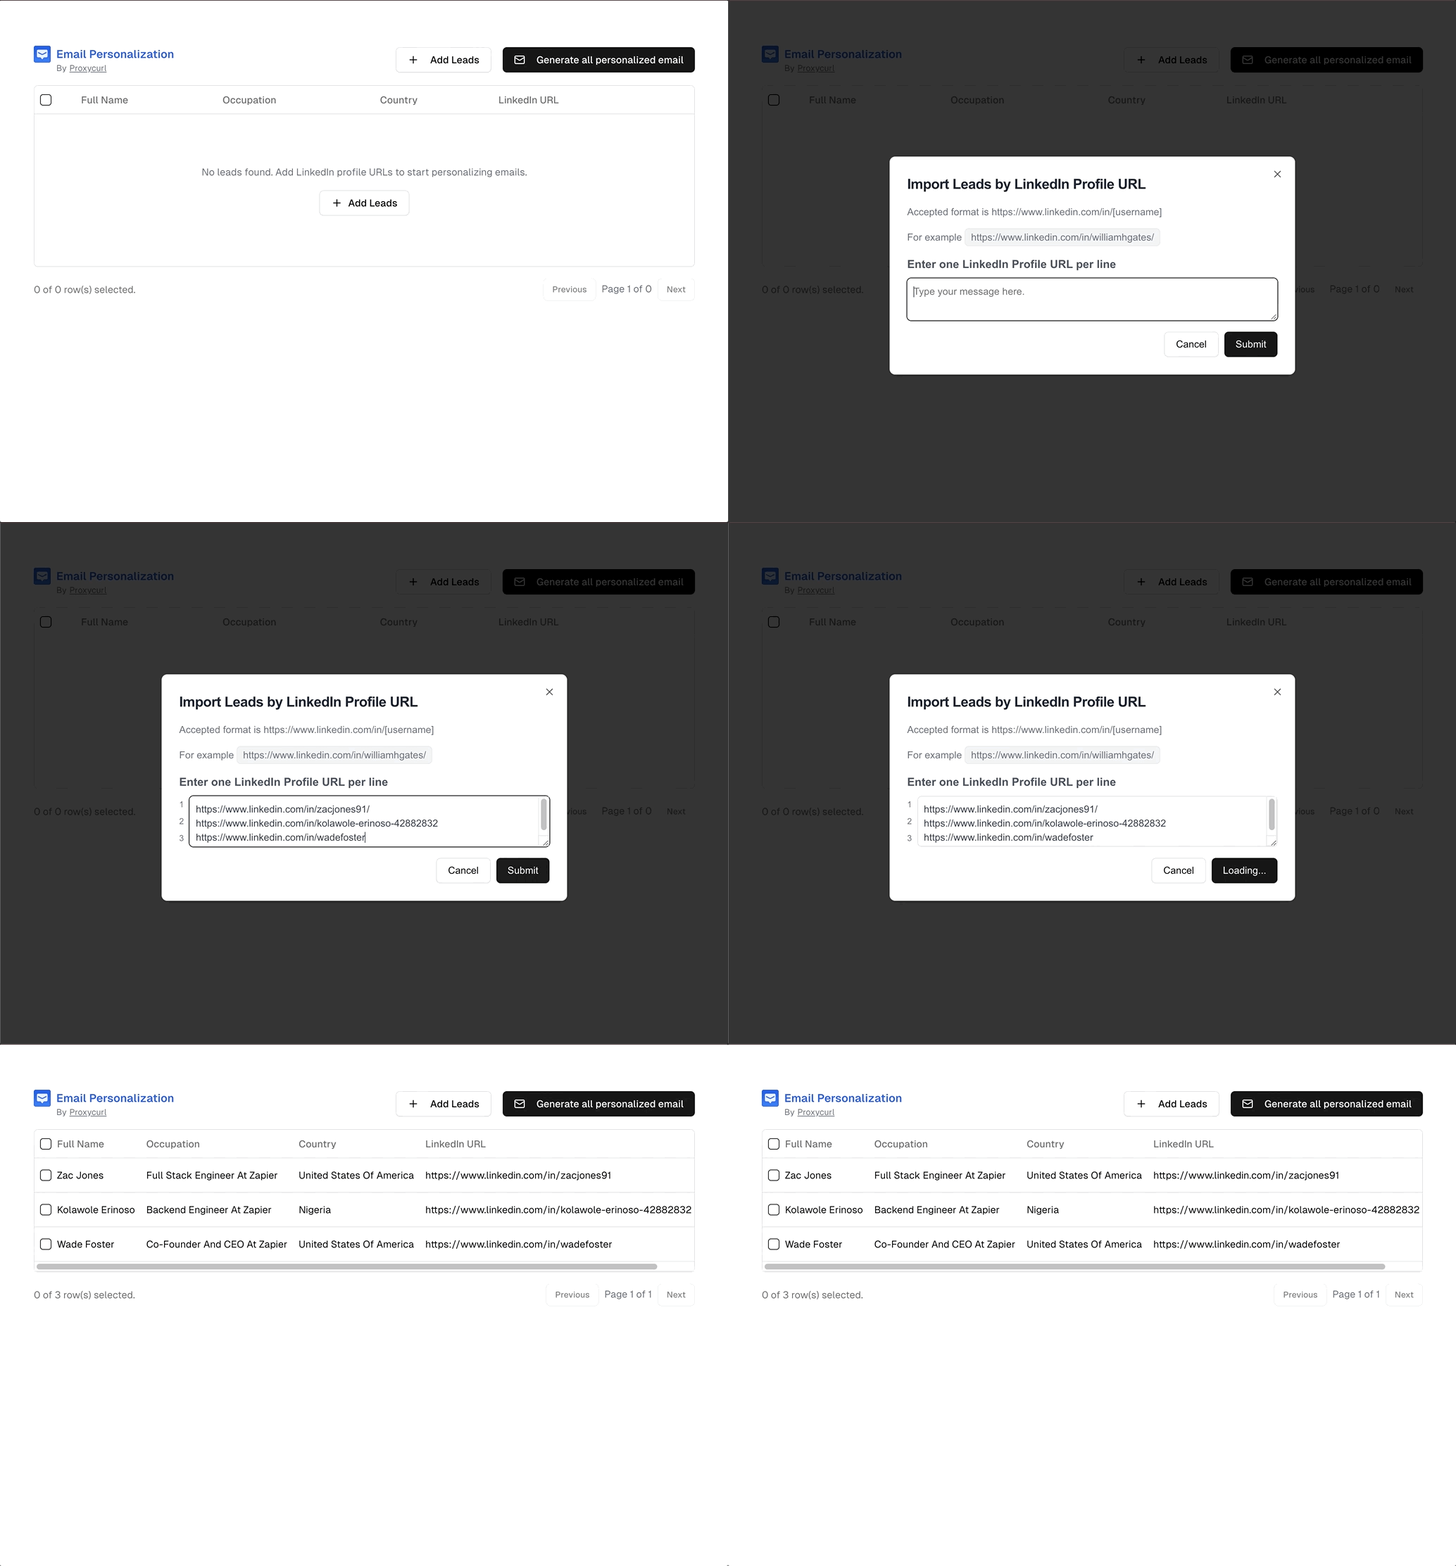
For ease of input, let’s create a modal to allow users to enter multiple Professional Social Network profile URLs at once.
Create email-personalization/app/components/Modal.jsx
import {
  Dialog,
  DialogContent,
  DialogTitle,
} from "@/components/ui/dialog";
import { Textarea } from "@/components/ui/textarea";
import { Button } from "@/components/ui/button";
import { cn } from "@/lib/utils";

const Modal = ({ isOpen, setIsOpen, leadsProfile, setLeadsProfile, handleSubmit, isLoading }) => {
  const hasInput = leadsProfile.trim().length > 0;

  return (
    <Dialog open={isOpen} onOpenChange={setIsOpen}>
      <DialogContent className="p-6 max-w-xl">
        <DialogTitle className="text-xl font-bold text-gray-800">
          Import Leads by Professional Social Network Profile URL
        </DialogTitle>
        <p className="mb-0 text-sm text-gray-500">
          Accepted format is https://www.professionalsocialnetwork.com/in/[username]
        </p>
        <p className="mb-0 text-sm text-gray-500">
          For example <span className="px-2 py-1 bg-gray-100 rounded-md border border-gray-200">https://www.professionalsocialnetwork.com/in/williamhgates/</span>
        </p>

        <div className={cn("space-y-2", "mt-0")}>
          <h2 className="text-base font-semibold text-gray-600">
            Enter one Professional Social Network Profile URL per line
          </h2>
          <div className="flex">
            {hasInput && (
              <div className="mr-2">
                {leadsProfile.split("\n").map((_, index) => (
                  <div key={index} className="py-1 text-xs text-gray-500">
                    {index + 1}
                  </div>
                ))}
              </div>
            )}
            <Textarea
              placeholder="Type your message here."
              value={leadsProfile}
              onChange={(e) => setLeadsProfile(e.target.value)}
              className="p-2 w-full placeholder-gray-400 text-gray-700 rounded-md border"
            />
          </div>
        </div>

        <div className="flex justify-end items-center space-x-2">
          <Button variant="outline" onClick={() => setIsOpen(false)}>
            Cancel
          </Button>
          <Button className="transition duration-200" onClick={handleSubmit}>
            {isLoading ? "Loading..." : "Submit"}
          </Button>
        </div>
      </DialogContent>
    </Dialog>
  );
};

export default Modal;
Then add these to the app/components/Leads.jsx
import Modal from "./Modal";

//...rest of code
const [isModalOpen, setIsModalOpen] = useState(false);
const [isLoading, setIsLoading] = useState(false);
const [leadsProfile, setLeadsProfile] = useState("");

const handleSubmit = () => {};
// function above is a placeholder
const handleAddLeads = () => {
    setIsModalOpen(true);
};
// add handleAddLeads function to both of the add lead button as an onClick handler
//...existing code

// add this above the last div
    <Modal
        isOpen={isModalOpen}
        setIsOpen={setIsModalOpen}
        leadsProfile={leadsProfile}
        setLeadsProfile={setLeadsProfile}
        handleSubmit={handleSubmit}
        isLoading={isLoading}
    />
</div>
Then, integrate the modal into Leads.jsx to make it accessible when users click “Add Leads.”
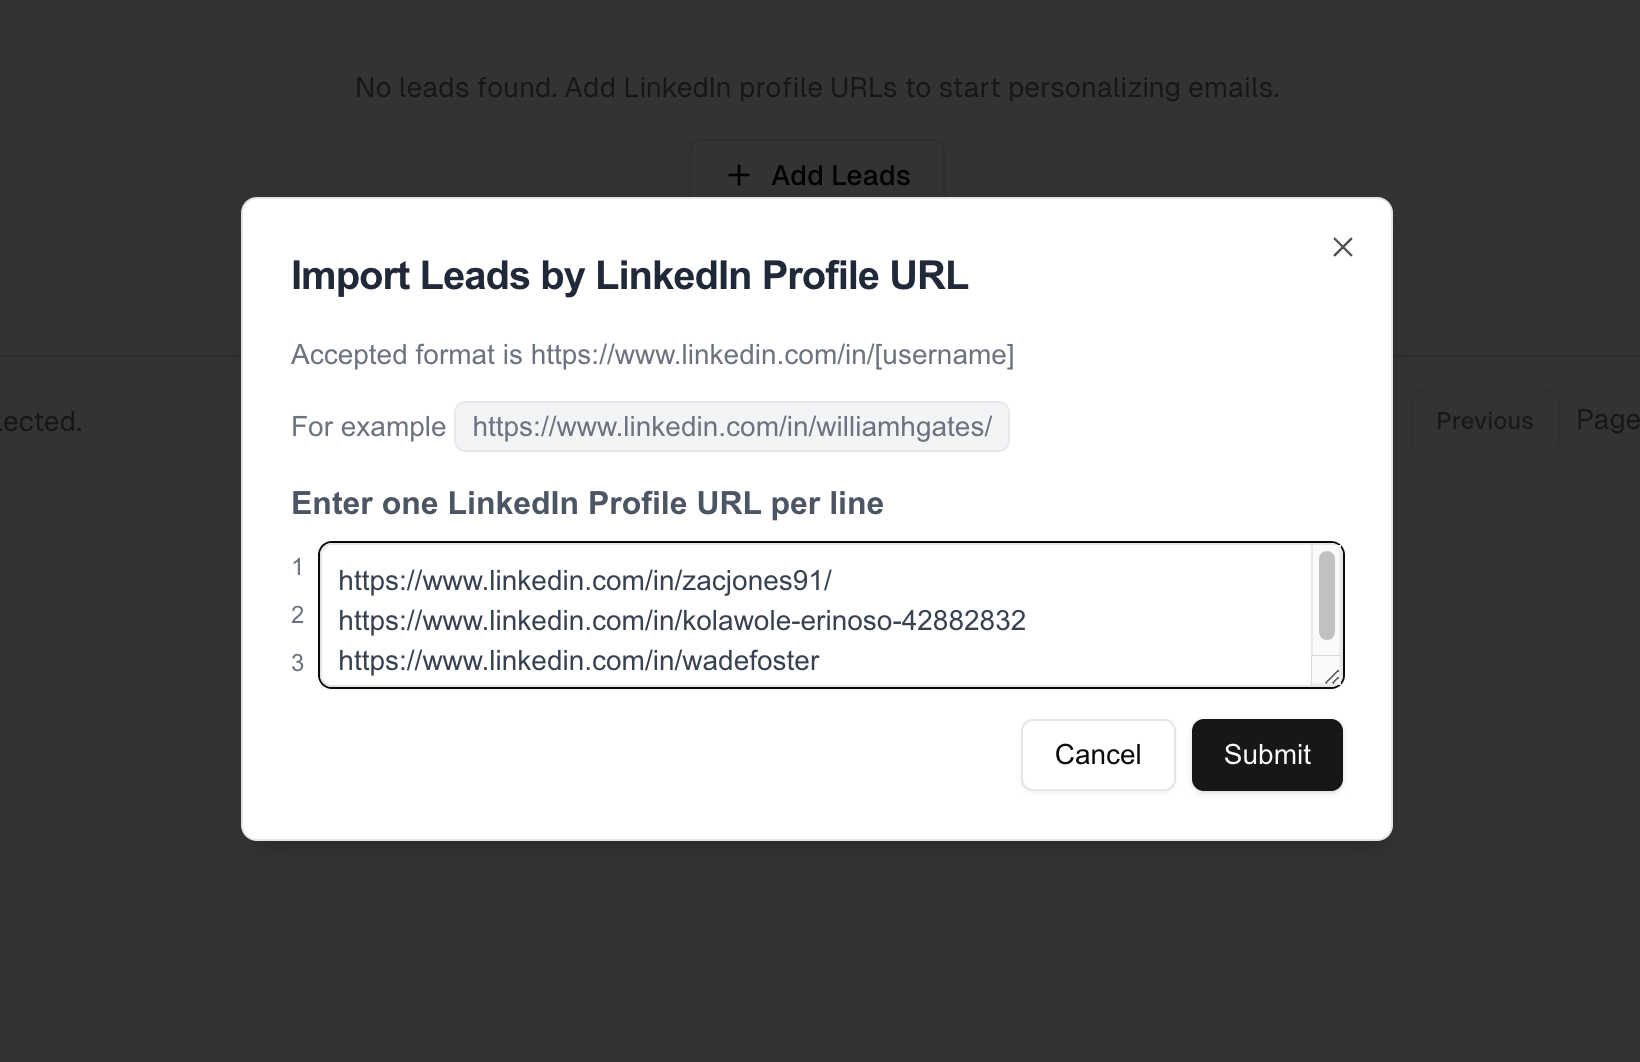
The modal allows bulk entry and streamlines data gathering by opening instantly on button click.
Step 5: Connecting API to the user input
Time for Proxycurl to shine. We will use the API to enrich Professional Social Network profiles with minimal effort. Pull relevant details directly from Professional Social Network profiles, adding more context to each lead.
Add function below to app/components/Leads.jsx
const handleSaveRecentLeads = (profiles) => {
    const existingLeads =
      JSON.parse(localStorage.getItem("existingLeads")) || [];

    profiles.forEach((profile) => {
      existingLeads.push({ ...profile, isEmailGenerated: false });
    });
    localStorage.setItem("existingLeads", JSON.stringify(existingLeads));
  };
Now, replace handleSubmit function in app/components/Leads.jsx with:
  const handleSubmit = async () => {
    setIsLoading(true);
    const lines = leadsProfile.split("\n");

    try {
      const responses = await Promise.all(
        lines.map((line) =>
          fetch(`/api/personProfile?Professional Social Network_profile_url=${line}`),
        ),
      );

      const parsedResponses = await Promise.all(
        responses.map(async (res) => {
          if (!res.ok) {
            throw new Error(`Error fetching profile: ${res.statusText}`);
          }
          return res.json();
        }),
      );
      setIsLoading(false);
      setData((prev) => [...prev, ...parsedResponses]);
      handleSaveRecentLeads(parsedResponses);
    } catch (error) {
      console.error("Failed to fetch profiles:", error);
    } finally {
      setIsModalOpen(false);
    }
  };
Then create app/api/personProfile/route.js
import { NextResponse } from "next/server";

export async function GET(request) {
  const params = request.url.split("?")[1];

  try {
    const response = await fetch(
      `https://nubela.co/proxycurl/api/v2/Professional Social Network?${
       params
      }`,
      {
        headers: {
          Authorization:`Bearer ${process.env.PROXYCURL_API_KEY}`,
        },
      },
    );

    const data = await response.json();
    return NextResponse.json(data);
  } catch (error) {
    console.log(error);
    return NextResponse.json({ error });
  }
}
Once connected, Professional Social Network profile data will be enriched with a single click. Something like this:
Step 6: Creating a Drawer component for prompting
Now, let’s generate custom email content. Start by creating a Drawer component to prompt the user for email customizations.
For that, we will create app/components/EmailDrawer.jsx
import { Button } from "@/components/ui/button";
import { Textarea } from "@/components/ui/textarea";
import {
  Sheet,
  SheetContent,
  SheetHeader,
  SheetTitle,
} from "@/components/ui/sheet";
import { useEffect, useState } from "react";
import Link from "next/link";
import { Mail } from "lucide-react";

function EmailDrawer({
  isOpen,
  setIsOpen,
  setSelectedLead,
  data,
  setGeneratedEmails,
}) {
  const [isLoading, setIsLoading] = useState(false);

  useEffect(() => {
    setGeneratedEmails(
      JSON.parse(localStorage.getItem("generatedEmails")) || [],
    );
  }, []);

  const initialPrompt = `You are professional sales with skills in cold outreach.

  Please customize the following email template with the attached Professional Social Network profile data. Please be consise and return the populated email template only.

Hi <FIRST_NAME>

<SOMETHING INTERESTING FROM PROFILE DATA AT LEAST 2 SENTENCES> Will a Professional Social Network Scraping API be useful for your  needs?`;

  const [prompt, setPrompt] = useState(initialPrompt);

  const handleSavePersonalizedEmail = (personalizedEmail, profile) => {
    const generatedEmails =
      JSON.parse(localStorage.getItem("generatedEmails")) || [];

    localStorage.setItem(
      "generatedEmails",
      JSON.stringify([
        ...generatedEmails,
        {
          email: personalizedEmail,
          public_identifier: profile.public_identifier,
        },
      ]),
    );

    setGeneratedEmails((prev) => [
      ...prev,
      {
        email: personalizedEmail,
        public_identifier: profile.public_identifier,
      },
    ]);
  };

  const handleSubmit = async () => {
    try {
      setIsLoading(true);
      const responses = await Promise.all(
        data.map((profile) =>
          fetch(`/api/generateEmail`, {
            method: "POST",
            headers: {
              "Content-Type": "application/json",
            },
            body: JSON.stringify({ prompt, profileJSON: profile }),
          }),
        ),
      );

      const results = await Promise.all(
        responses.map((response) => response.json()),
      );
      results.forEach((email, index) => {
        handleSavePersonalizedEmail(email, data[index]);
      });
    } catch (error) {
      console.error("Error fetching email:", error);
    } finally {
      setIsLoading(false);
    }
  };

  const handleOpenChange = (open) => {
    setIsOpen(open);
    if (!open) {
      setSelectedLead(null);
    }
  };

  return (
    <Sheet open={isOpen} onOpenChange={handleOpenChange}>
      <SheetContent className="overflow-auto">
        <SheetHeader>
          <SheetTitle>Bulk generate personalized emails</SheetTitle>
        </SheetHeader>
        <div className="grid gap-4 py-4">
          <span className="text-sm text-gray-500">
            Variables reference:{" "}
            <i className="font-bold">
              first_name, last_name, full_name, headline, summary, company,
              company_url, city, state, country, experiences, educations, skills
              and many more.
            </i>
          </span>
          <Link
            className="text-sm text-blue-500 underline hover:text-blue-600"
            href="https://nubela.co/proxycurl/docs#people-api-person-profile-endpoint"
            target="_blank"
          >
            Read more
          </Link>
          <Textarea
            placeholder="Type your prompt here."
            value={prompt}
            onChange={(e) => setPrompt(e.target.value)}
            className="h-[300px] overflow-y-auto"
          />

          <div>
            <span className="whitespace-nowrap">Generate email for </span>
            {data.map((profile, index) => (
              <span className="font-bold" key={profile.public_identifier}>
                {profile.full_name}
                {index < data.length - 1 && ", "}
              </span>
            ))}
          </div>

          <Button onClick={handleSubmit}>
            {isLoading ? (
              "Generating..."
            ) : (
              <>
                <Mail className="w-4 h-4" />

                <span>Bulk generate emails</span>
              </>
            )}
          </Button>
        </div>
      </SheetContent>
    </Sheet>
  );
}

export default EmailDrawer;
And then add it to app/components/Leads.jsx
import EmailDrawer from "./EmailDrawer";
// ...existing codes
  const [isEmailDrawerOpen, setIsEmailDrawerOpen] = useState(false);
  const [generatedEmails, setGeneratedEmails] = useState([]);
  const [selectedLead, setSelectedLead] = useState(null);

 const handleBulkGenerateEmail = () => {
    setIsLoading(true);
    setIsEmailDrawerOpen(true);
  };

// and then add it as onClick to "Generate all personalized" button

<EmailDrawer
    data={data}
    selectedLead={selectedLead}
    setSelectedLead={setSelectedLead}
    isOpen={isEmailDrawerOpen}
    setIsOpen={setIsEmailDrawerOpen}
    setGeneratedEmails={setGeneratedEmails}
/>
This opens a side drawer when a user clicks the "Generate all personalized" button. It looks like this:
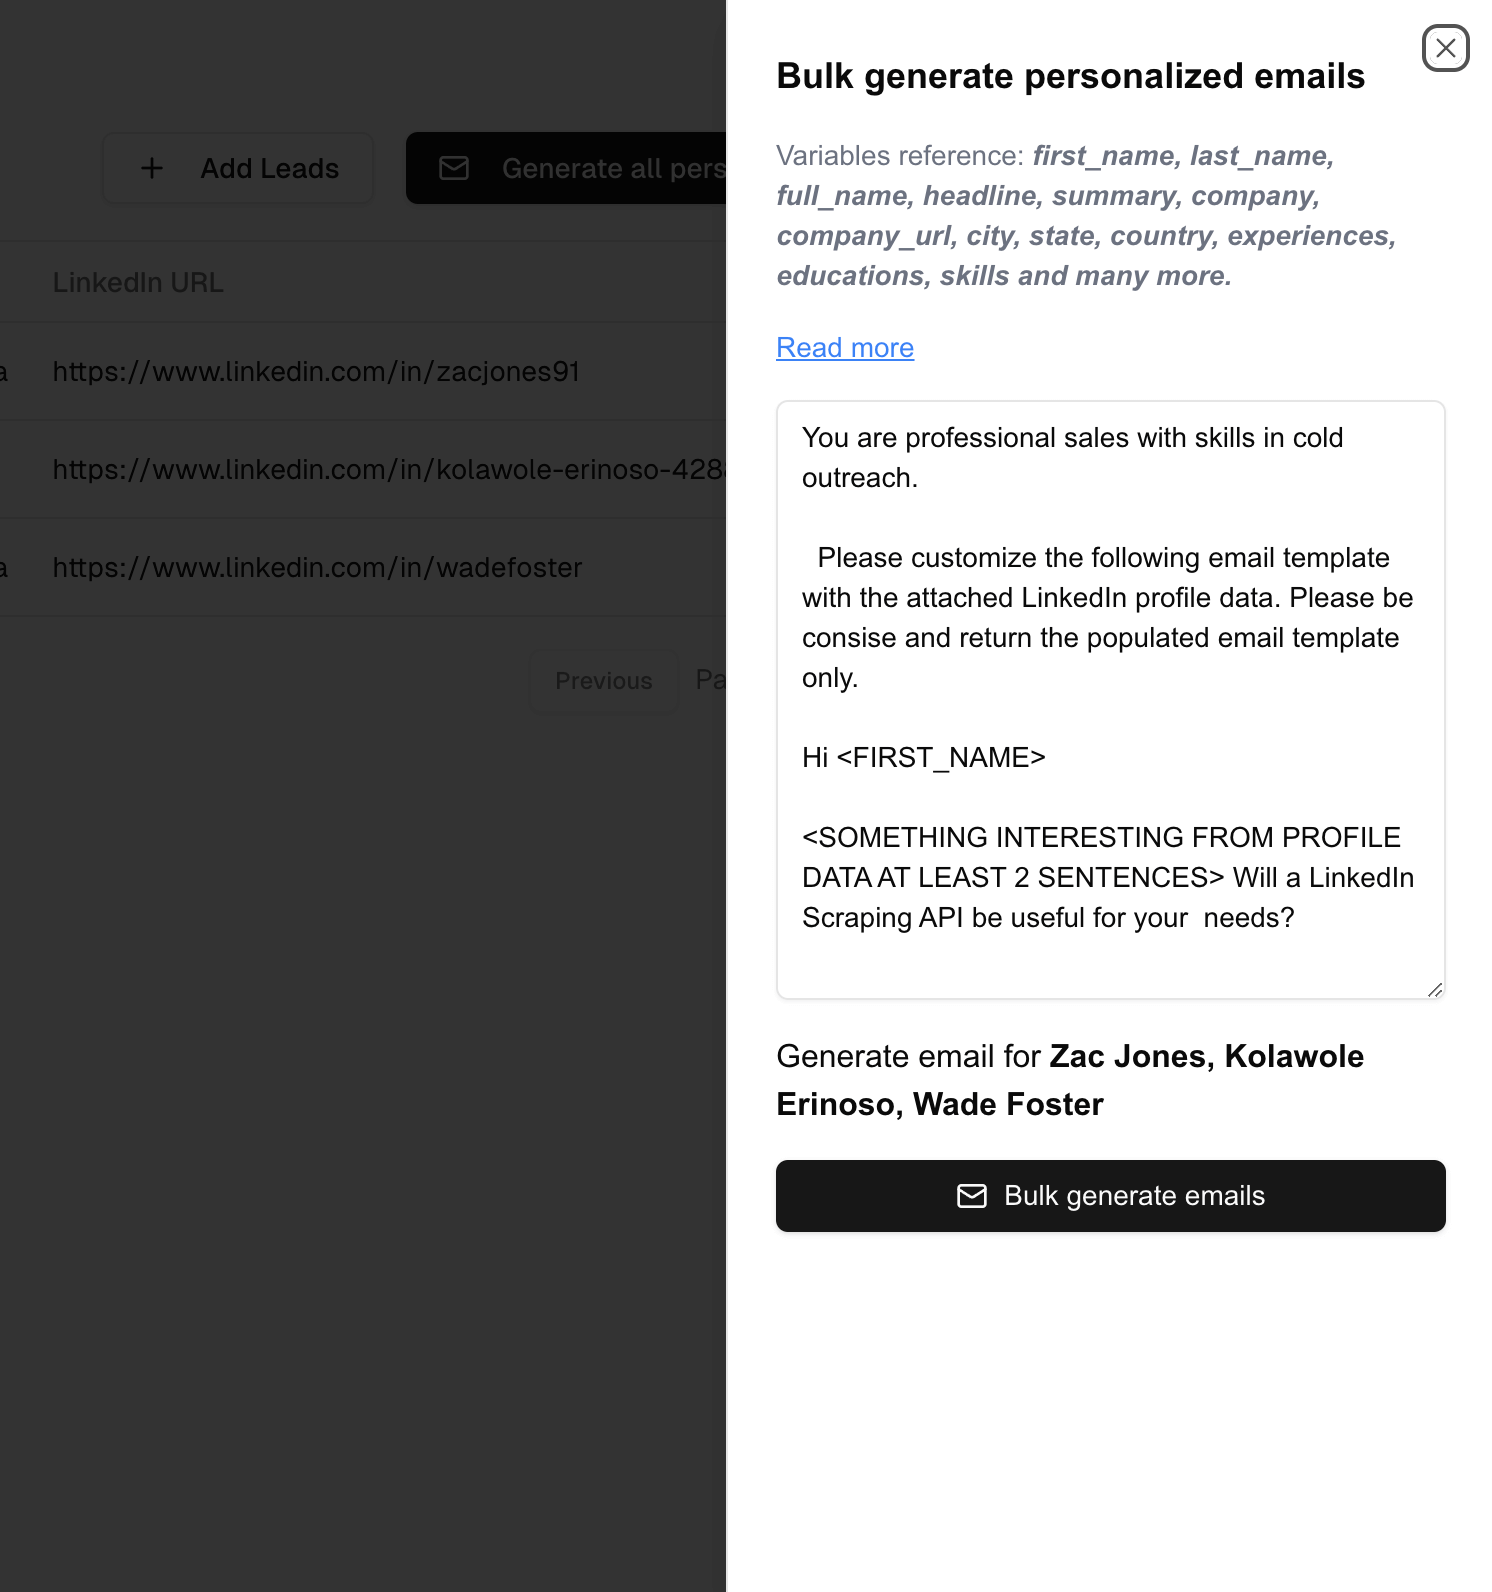
With this interface, it is easier to prompt OpenAI with your exact requirements.
Step 7: Set Up OpenAI API Route for Email Generation
To generate emails, we’ll need an API route to connect to OpenAI.
Create app/api/generateEmail/route.js and set this code up:
import { NextResponse } from "next/server";
import OpenAI from "openai";

export async function POST(request) {
  const openai = new OpenAI({
    apiKey: process.env.OPENAI_API_KEY,
  });

  const { prompt, profileJSON } = await request.json();

  try {
    const basePrompt = `
      ${prompt}

      Instructions:
      Replace every variable that is in <> format with value from with the first_name from the profileJSON below.
      Replace <SOMETHING INTERESTING FROM PROFILE DATA> with something interesting from the profileJSON below.

      profileJSON:
      ${JSON.stringify(profileJSON)}
    `;

    const baseCompletion = await openai.chat.completions.create({
      model: "gpt-3.5-turbo",
      temperature: 0.65,
      messages: [{ role: "user", content: basePrompt }],
    });

    const promptOutput = baseCompletion.choices[0].message.content;
    return NextResponse.json(promptOutput);
  } catch (error) {
    console.log(error);
    return NextResponse.json({ error });
  }
}
This will call OpenAI’s API to generate personalized email copy for each lead.
Step 8: Displaying generated emails
To easily review and copy the generated emails, create a simple card component with a copy button.
Create app/components/GeneratedEmailsGallery.jsx and add the following code:
import { useState } from "react";
import { Button } from "@/components/ui/button";
import { Card } from "@/components/ui/card";

function GeneratedEmailsGallery({ generatedEmails }) {
  const [copiedIndex, setCopiedIndex] = useState(null);
  const [currentPage, setCurrentPage] = useState(1);
  const emailsPerPage = 9;

  const handleCopy = (index) => {
    navigator.clipboard.writeText(generatedEmails[index]);
    setCopiedIndex(index);
    setTimeout(() => {
      setCopiedIndex(null);
    }, 2000);
  };

  if (!generatedEmails.length) return null;

  const totalPages = Math.ceil(generatedEmails.length / emailsPerPage);
  const startIndex = (currentPage - 1) * emailsPerPage;
  const displayedEmails = generatedEmails.slice(startIndex, startIndex + emailsPerPage);

  return (
    <div className="mt-8">
      <h2 className="mb-4 text-xl font-semibold">Generated Emails</h2>
      <div className="grid grid-cols-1 gap-4 sm:grid-cols-2 lg:grid-cols-3">
        {displayedEmails.map((email, index) => (
          <Card key={startIndex + index} className="flex flex-col p-4 shadow-none">
            <p className="mb-2 text-sm text-gray-600">Generated email for {email.public_identifier}</p>
            <div className="mb-2 h-[200px] overflow-y-auto bg-gray-50 p-4 rounded-md border">
              <p className="text-sm whitespace-pre-wrap">{email.email}</p>
            </div>
            <Button
              className="ml-auto w-16"
              variant="outline"
              size="sm"
              onClick={() => handleCopy(startIndex + index)}
            >
              {(startIndex + index) === copiedIndex ? "Copied" : "Copy"}
            </Button>
          </Card>
        ))}
      </div>
      {generatedEmails.length > emailsPerPage && (
        <div className="flex justify-end items-center mt-4 space-x-2">
          <Button
            variant="outline"
            size="sm"
            onClick={() => setCurrentPage(prev => Math.max(1, prev - 1))}
            disabled={currentPage === 1}
          >
            Previous
          </Button>
          <span className="text-sm text-gray-500">
            Page {currentPage} of {totalPages}
          </span>
          <Button
            variant="outline"
            size="sm"
            onClick={() => setCurrentPage(prev => Math.min(totalPages, prev + 1))}
            disabled={currentPage === totalPages}
          >
            Next
          </Button>
        </div>
      )}
    </div>
  );
}

export default GeneratedEmailsGallery;
Finally, integrate this gallery in Leads.jsx:
import GeneratedEmailsGallery from "./GeneratedEmailsGallery";

//...existing codes
<GeneratedEmailsGallery generatedEmails={generatedEmails} />
And that’s it! With Proxycurl and OpenAI at the core, now you’ve got your own Lemlist clone app. Goodbye to uninspiring generic emails and hello to bulk personalized emails, all with minimal manual work.
This is what you would've built - a fully functional email personalization tool, just like Lemlist's own. Here's the full source code in our GitHub repository again.

Application Features
Don’t forget to have fun and add your own twist wherever you want. If you come across any problems, feel free to reach out to us via email or live chat.
Power your innovation with Proxycurl
Building something meaningful takes a lot, and as a developer, I know the drill. Proxycurl understands this journey. Our tools are crafted with your unique challenges in mind. We host a suite of APIs and a database of over 500 million profiles. The possibilities to empower this data is endless, just like your potential. Let us handle the data heavy-lifting so you can do what you do best: create, build, and innovate.
Ready to turn your ideas into reality? Let us give you a push. Get free credits upon sign up with Proxycurl!
FAQs
What is Lemlist?
Lemlist is a popular email outreach platform that helps businesses send personalized cold emails at scale. It enables users to customize their emails, automate follow-ups, and track engagement, all while aiming to improve deliverability and response rates. The platform is particularly valued for its ability to create hyper-personalized email campaigns to stand out in crowded inboxes.
Why should I build a Lemlist clone instead of using Lemlist directly?
Building your own app offers flexibility, customization, and ownership. You can tailor the app to your specific needs, integrate additional features, and avoid subscription costs associated with pre-built tools.
Is it cost-effective to build this app compared to using Lemlist?
Yes, while there may be initial development costs, building your app eliminates ongoing subscription fees and gives you complete control over the tool.
Can I customize the features of my Lemlist clone app?
Absolutely! This guide offers a base implementation, but you can expand its functionality based on your requirements. For instance, you can add email scheduling, advanced analytics, or A/B testing capabilities.
